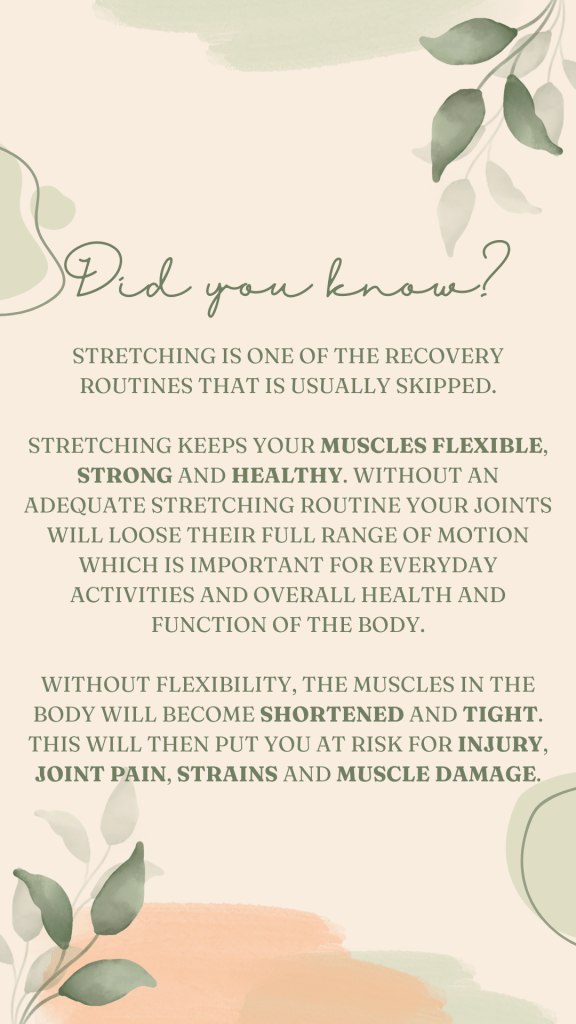
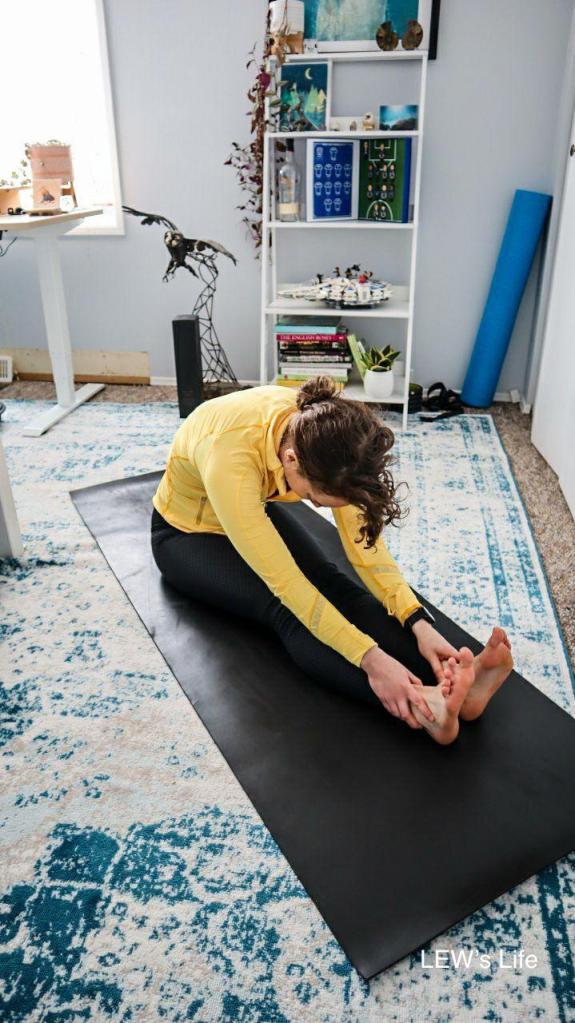
Stretching is an activity that is usually skipped in the health and wellness world but it’s one of the most important routines to be sure to get in.
Stretching keeps your muscles flexible, strong and healthy. Without an adequate stretching routine your joints will loose their full range of motion which is important for everyday activities and overall health and function of the body. Without flexibility the muscles in the body will become shortened and tight. The problem with this happening is when you want those muscles to work for the activity you are doing, they will be weak and unable to extend all the way. This will then put you at risk for injury, joint pain, strains and muscle damage.
As an example, one of the muscles that will become tight with extended amounts of sitting in a chair is the hamstrings which can be found at the back of your leg. When this muscle becomes tight it will limit knee extension which will then inhibit walking. On the other hand, when the muscles are tight and are quickly called on for a high intensity activity such as tennis – they may be over stretched and cause a strain to the muscle. Injured muscles may not be strong enough to support the joints they connect to which can eventually lead to joint injury.
Where to start?
It can seem overwhelming to start stretching when you have a body full of muscles. Instead, start with the critical areas such as the neck and upper back along with the hips and legs. Pick one stretch for each area, such as a trap stretch, chest stretch, hamstring stretch and glute stretch. Then stretch them for 15-30 seconds on each side everyday – that will only take you 5 minutes to do! Commit to 5 minutes a day of stretching to start. If that seems overwhelming, then commit to 5 minutes of stretching every other day or 3-4 times a week. Everyone has 5 minutes to spare in their day somewhere.
Keep in mind that stretching once or twice will not correct the tight muscles you have in your body. It has mostly likely taken you months to years to become as tight as you are, so it can potentially take the equivalent amount of time to reverse the tightness and become flexible. So be sure to be consistent and work at it everyday. If you stay consistent you will start to notice a difference and you may even want to extend it from 5 minutes a day to 20-30 minutes as you will be feeling so much better!
How to stretch properly
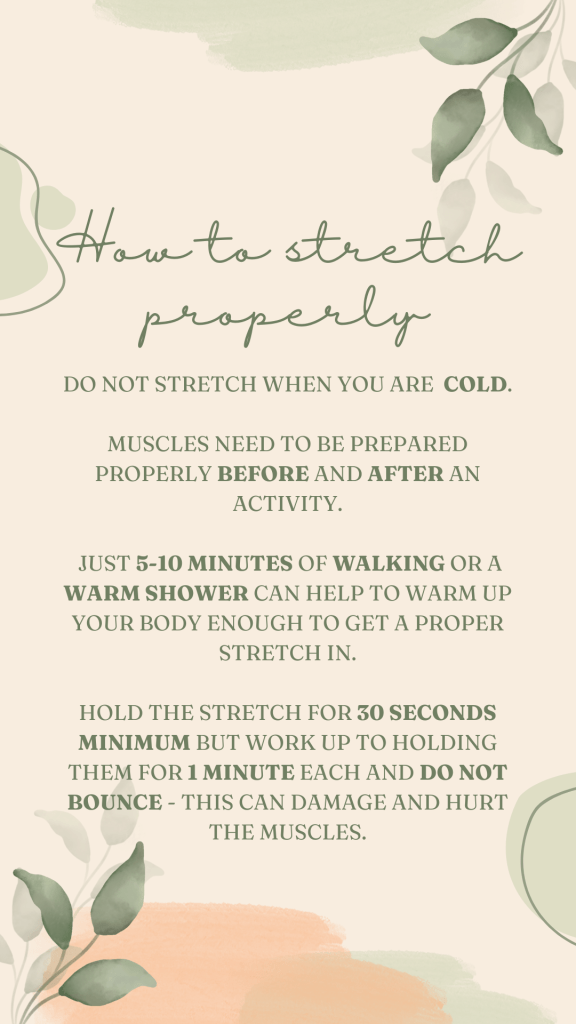
Do not stretch a muscle when you’re cold and you have not warmed up properly. Muscles need to be prepared properly before an activity. Just 5-10 minutes of walking can help to warm up your body enough to get a proper stretch in. Don’t have time for 5-10 minutes of walking? Start with a warm shower to get your blood flow going towards all of the amazing muscles you have in your body.
Hold the stretch for 30 seconds minimum but work up to holding them for 1 minute each. DO NOT BOUNCE – this can damage and hurt the muscles and is not beneficial for you to do. Reach and hold the stretch still – it may feel tight at first but as you hold the stretch you will notice the tension will loosen and you may even be able to stretch further!
Bottom Line
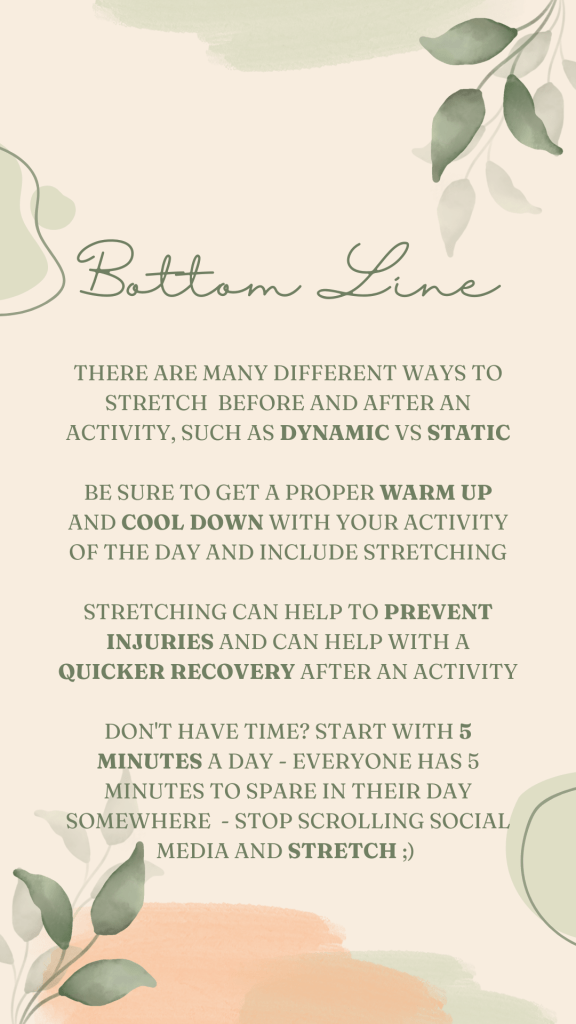
There are many different ways to stretch before and after an activity, such as dynamic vs static. Dynamic stretching is a movement stretch that you would use to warm up before an activity and static stretching is the reach and hold stretch that you would use for a cool down after an activity.
Be sure to get a proper warm up and cool down with your activity of the day and include stretching.
Stretching can help to prevent injuries and can help with a quicker recovery after an activity.
Don’t have time? Start with 5 minutes a day – everyone has 5 minutes to spare in their day somewhere – stop scrolling social media and stretch ;).
Give these tips a try and slowly start adding a stretching routine into your everyday life!
There are a lot of stretches and exercises you can do to help loosen up your lower back. But when you have bad enough nerve pain that even putting on your socks or shoes is a real struggle, you’ll want to stay with more gentle exercises. My first tip is if your back pain is bad enough that it is lingering in your lower back or is potentially shooting down your leg, you need to consult an Athletic Therapist or Physiotherapist for in-person treatment. However, while you wait for your appointment with them, in this blog post I wrote up 10 exercises you can give a try when you have new (acute) and inflamed lower back nerve pain.
IMPORTANT: If you are suffering from sharp or shooting nerve pain in your lower back or going down your leg, this is your sciatic nerve. When a nerve is inflamed and in the acute stages of healing, the last thing you want to do is stretch that nerve even more as this may irritate the nerve. As you are doing any of these exercises, listen to your body and be mindful of how you feel while doing them. If there is any intense pain, you need to stop or not push as far into the stretch. Move slow when going into these stretches as any fast movement may pinch the nerve and cause pain. These should be PAIN-FREE when you are in the acute stages of your injury. Do not feel like you need to do all of the exercises listed, you can do a handful of them or all of them depending on how you feel until your pain subsides. With all of this in mind, let’s begin.
Wall Ball Glute Release: Take a lacrosse ball or tennis ball and place it into the meaty part of your buttocks (do not place it on your spine). Lean against a wall, and push your body weight into the ball. Roll the ball slowly from side to side and up and down until you hit a spot that is causing a minor amount of discomfort (this is a trigger point). You only want this discomfort to be a 5/10 on the pain scale (1 = no pain, 10 = the worst pain you have ever felt). Stay on this spot until the pain subsides to a 1-2/10, this should occur within 10 seconds. If it does not subside, stays at the 5/10 or gets worse let it go and move to a new spot. Continue this routine for 3-5 min to give you a good chance to find all of your trigger points. Repeat this on the other side.
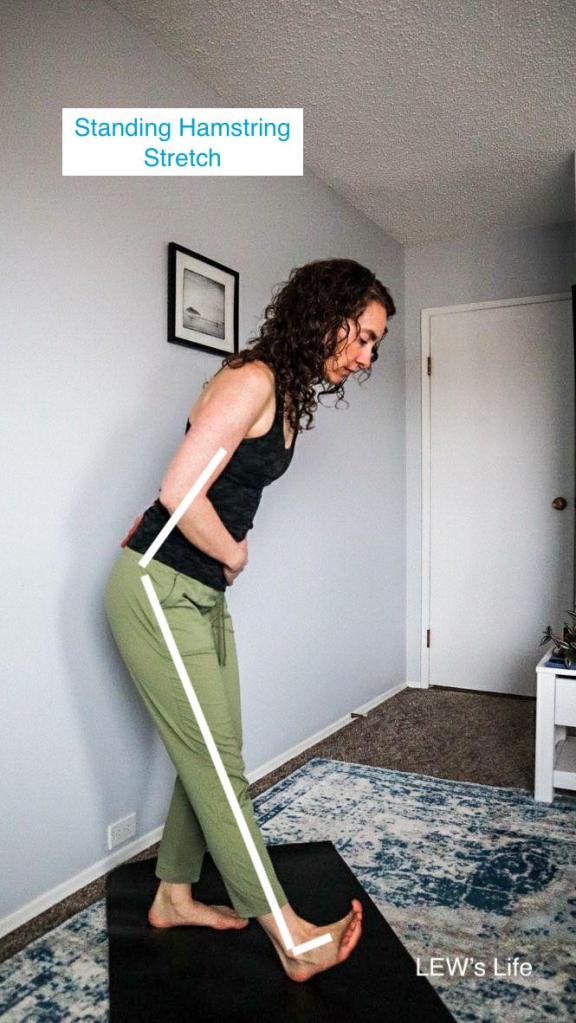
Standing Hamstring Stretch: As I mentioned above, we do not want to stretch the nerve right now, so be sure you slowly move into this stretch and only go as far as you start to get a comfortable stretch into your hamstrings (the back of your leg). Step one leg forward and point the toes and foot of that leg up toward the sky. Be sure you are bending through your hips and not your lower back, and lean forward slowly until you start to feel a stretch in the back of your leg. Hold this stretch starting with 5 seconds, engage your core and glutes and stand back up. Repeat on the other side and work up to being able to hold this stretch for 10 seconds.
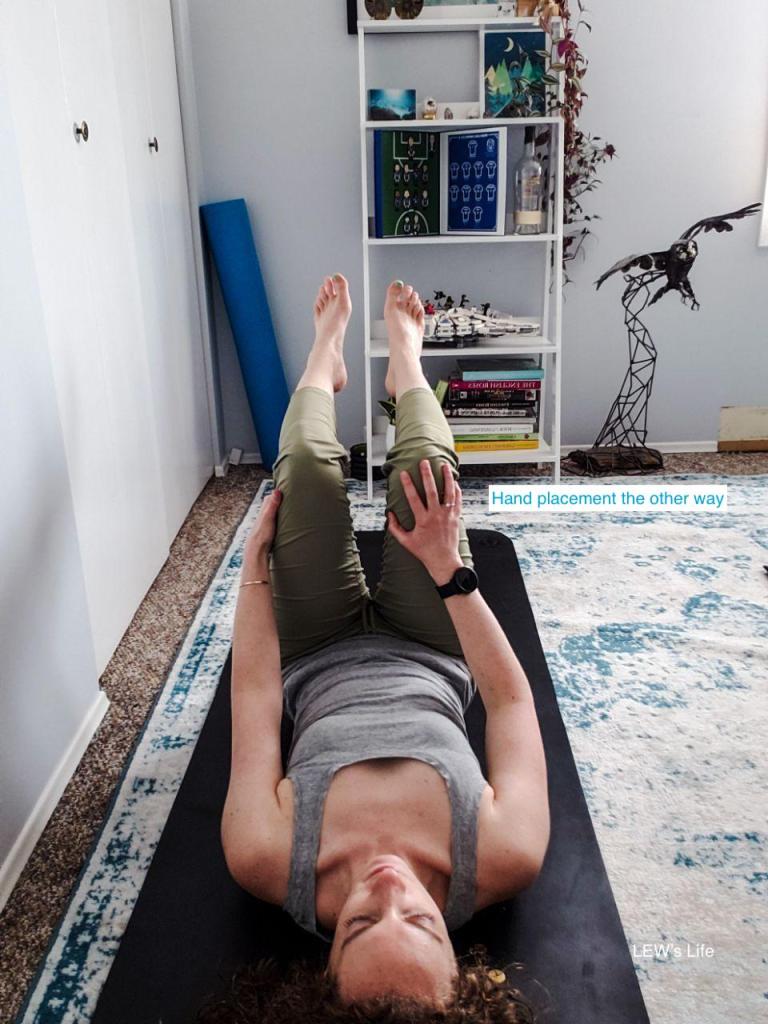
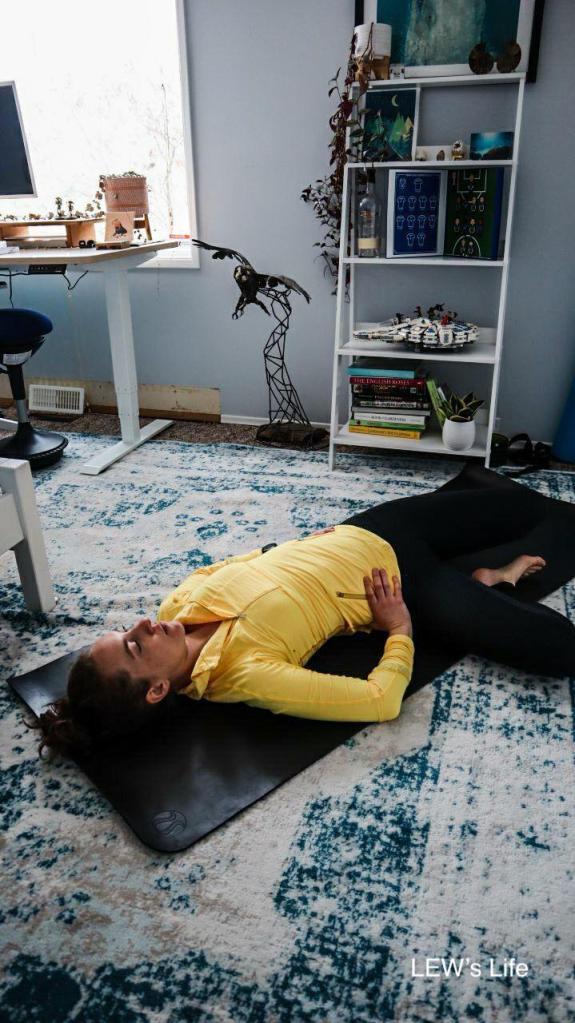
Pelvic Tilt: Laying on your back with both of your knees bent, tilt your pelvis backwards as if you are flattening your lower back to the ground. Only go so far into this tilt that it is pain-free, but try to tilt further each time if you can, but DO NOT push too far into it where you cause pain in your back. Remember, you want all of these exercises to be pain-free at this stage. Repeat this tilt 5 times and build up to being able to do it 10 times.
TA Activation: This exercise is to get a gentle contraction to your abdomen, this will help to strengthen your spine. When your spine is injured, it needs the support of the surrounding muscles. Laying on your back with both of your knees bent, contract your abdomen in towards your spine and slightly up towards your heart. If you are having trouble with this movement, take a deep breath into your belly, as you exhale, continue that exhale in towards your spine and push all of the air out of your lungs. Now hold that contraction but breathe normally at the same time. If you can, add a pelvic floor contraction at the same time by doing a kegel. Hold the contraction and do 5-10 breaths, let it go and repeat 3 times.
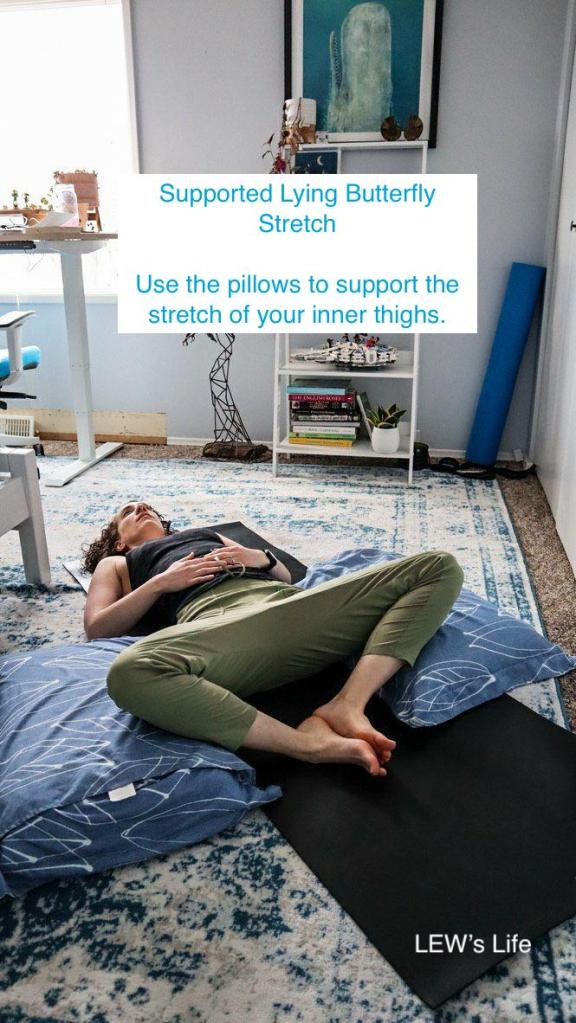
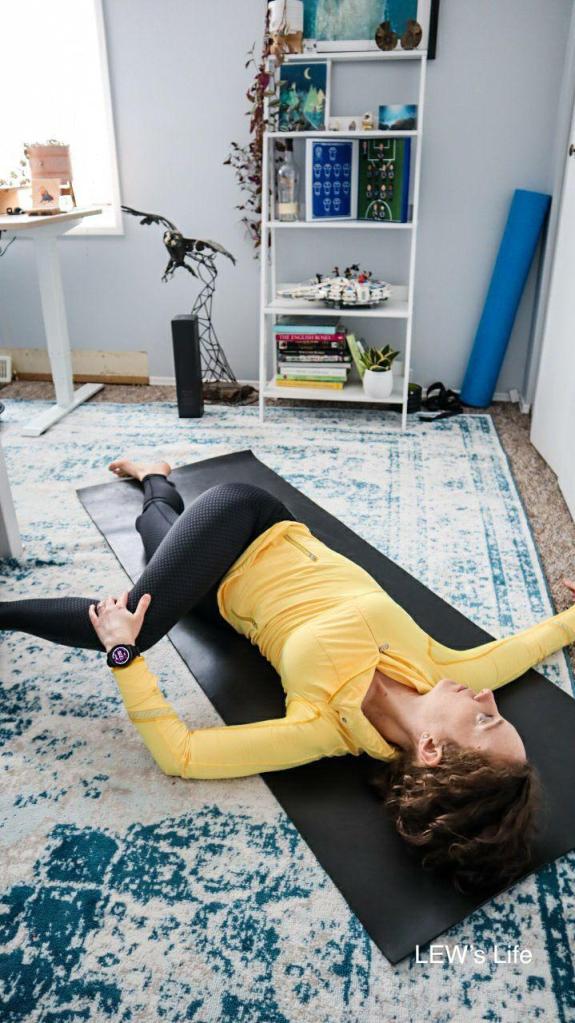
Supported Lying Butterfly Stretch: Laying on your back, place two pillows next to your hips. Bend both of your knees with your feet touching the ground. Allow both knees to drop to the side so that your legs are in an open position. Your knees will be rested on top of the pillows, allow your legs to relax and let gravity gently stretch the inside of your thighs. Hold this stretch for 5-10 seconds, and when you are ready to come out of the stretch use your hands to help guide your legs back up.
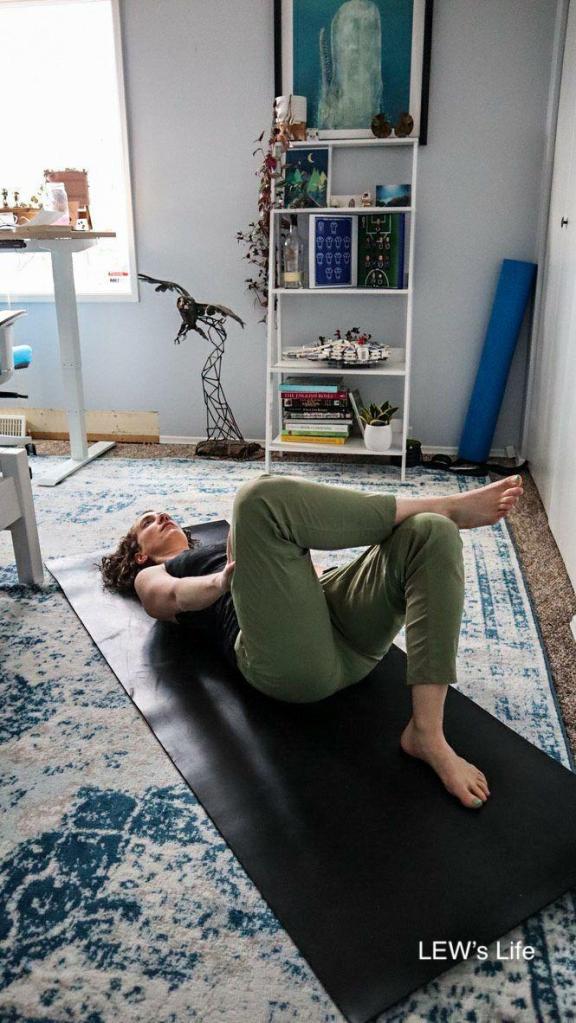
Knee To Chest: Laying on your back let one leg extend out straight, and slowly move your bent knee in towards your chest. Use your hands and arms to help support your leg into your chest. Only go so far as you feel a comfortable stretch and no pain. Hold this stretch for 5-10 seconds, and when you are finished slowly lower your bent leg back to the ground, bend your straight leg up and then extend the opposite leg and repeat on the other side.
Laying Figure 4: Laying on your back, bend both of your knees and rest your feet on the ground. Cross one ankle over the opposite knee, and gently push the bent knee down until you feel a stretch. If you feel you can go further into the stretch, pull the leg with the ankle crossed over it up towards your chest. Be sure that this movement is slow and pain-free. Hold either stretch for 5-10 seconds and repeat on the other side.
Lumbar Rotations – Windshield Wipers: Laying on your back bend both of your knees and rest your feet on the ground. Slowly and with control, engage your core (the TA activation you did above) to support your spine, and let both knees drop to one side. Only go as far as your body will allow right now with no pain. Be sure your core is still engaged and bring both knees over to the other side. Repeat going back and forth 5-10 times with trying to drop your knees closer to the ground each time as long as your back allows it.
Side-lying Quad and Hip Flexor Stretch: Laying on your side, bending your bottom knee for extra support and straightening your top leg. Now, slow and controlled, bend your top knee so your foot is going towards the same side hand. Grab onto your foot with your same side hand, gently pelvic tilt (as we talked about above), and be sure your leg is in line with your hips and not bent forward. You should feel this stretch in the front of your hip and leg comfortably with no pain. Hold this stretch for 5-10 seconds. Repeat on the other side.
Go for a short walk: With any lower back, leg or hip pain, you want to avoid sitting for too long. The longer you sit the more the muscles will tighten up and push on the nerves causing pain. Set a timer for 20 min and stand up, walk around for a bit or go for a short 10 min walk to stretch your legs and loosen up the nerve. You don’t want to go too far in the acute stages of your back pain, as you don’t want to be stuck not being able to get back due to pain.
There are many stretches and exercises you can try to help alleviate your back pain during the beginning stages of your back injury. Above are a few of them, I would also suggest having a bath or applying heat to your back to help loosen the muscles even further. I cannot emphasize enough how important it is to go and see a healthcare provider like an athletic therapist or physiotherapist to help you heal correctly from your back pain. However, in the meantime, you can try the exercises mentioned above. Above all else, know that this will take time to heal, be kind to yourself and listen to your body knowing that pain relief is just around the corner.
Did you know that your hips can become unleveled? I’m not saying they are ‘out of place,’ because if they were you would be making a trip to the hospital as they would be dislocated at that point. What I’m talking about is how your hips can be tugged and pulled on by the muscles that attach to them causing the bones in your hips to rotate front to back. Usually, the culprit can be one quadriceps muscle or hip flexor that is really tight on one side and a hamstring muscle can be really tight on the other. Or the same situation but above the pelvis where your lower back muscles may be playing tug of war with your abdomen and adductor muscles. There is also a condition called, ‘lower cross syndrome’ that can also play a part.
Lower cross syndrome:
As referenced from Physiopedia, “The lower crossed syndrome (LCS) is the result of muscle strength imbalances in the lower segment. These imbalances can occur when muscles are constantly shortened or lengthened in relation to each other.“1 This in turn can potentially cause your hips to have a misalignment and rotate to the front and to the back. As shown in the photo to the right, usually this is caused by weak abdominal muscles and gluteal muscles, along with tight hip flexors and back extensors.
This can all be corrected with the right muscle strengthening, mobility and stretching for long-term benefits, however, there is a way to correct your hip alignment with a bit of PNF stretching. If you have not read any of my other posts, “Proprioceptive Neuromuscular Facilitation (PNF) is an advanced form of flexibility training, which involves both the stretching and contracting of the muscle group being targeted. PNF stretching is one of the most effective forms of stretching for improving flexibility and increasing range of motion.“2
How to do the exercise:
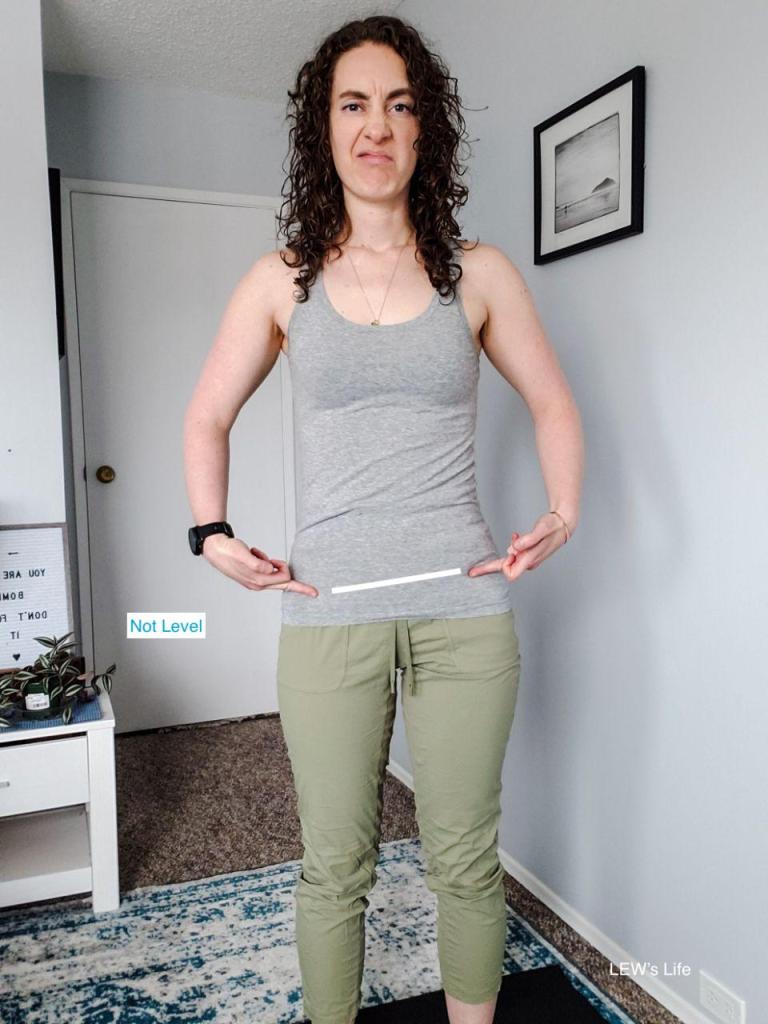
Hips level: Place your hands on your hips – where the top of your pelvic bones start, above it is soft tissue. Then rest your fingers down on a 45º angle to find the ASIS (boney ridge on the front of your hips that feels like it has a dip and shelf – shown in red to the right). Look at yourself in the mirror and see your two finger levels on the ASIS. If they are even and at the same level across your hips they are good. If there is one higher and one lower, your hips are rotated and need to be corrected before physical activity or a daily routine.
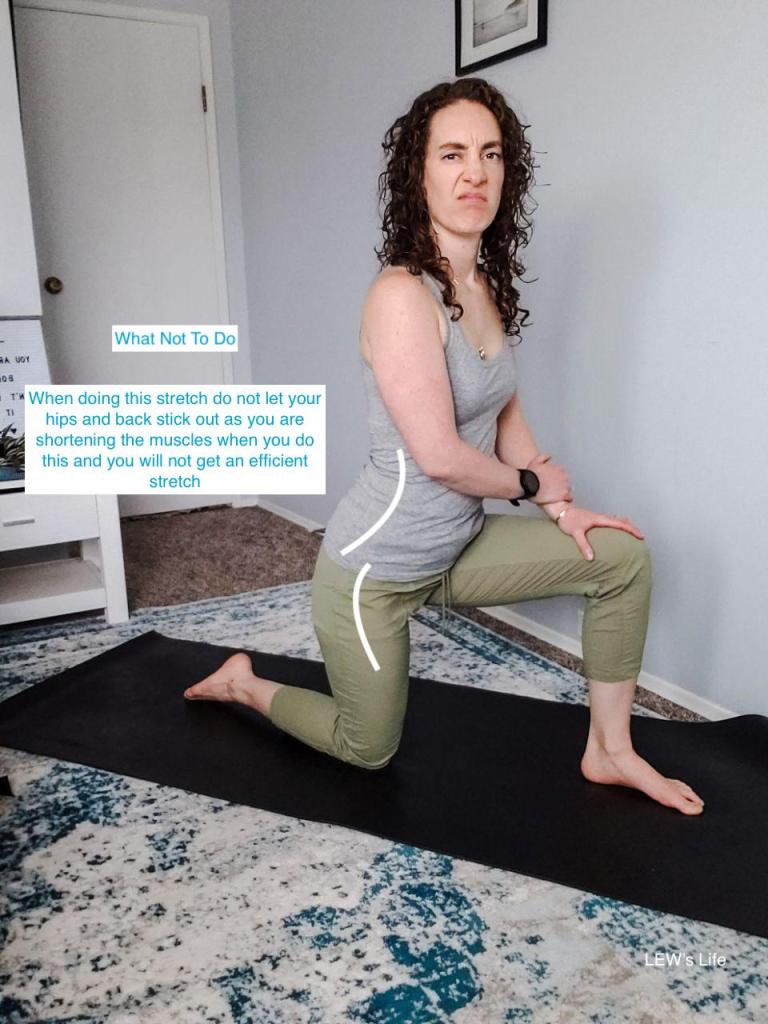
To correct the quad and hip flexor groups: The side that has the ASIS down (the finger that was lower than the other), you will be stretching that quad and hip flexor group. In a runner’s lunge, keep your chest up and pelvis tilted forward then lunge forward until you feel a stretch. Hold the stretch for 8-10 seconds then lightly contract your bent knee into the ground as if you are moving the limb into hip flexion. Hold the contraction for 5 seconds, stop the contraction and move further into the stretch and hold the stretch for another 10 seconds. Repeat this sequence 2-4 times. Stand back up and check your hip levels in the mirror, if they are still not level you must work on the opposite hamstring.
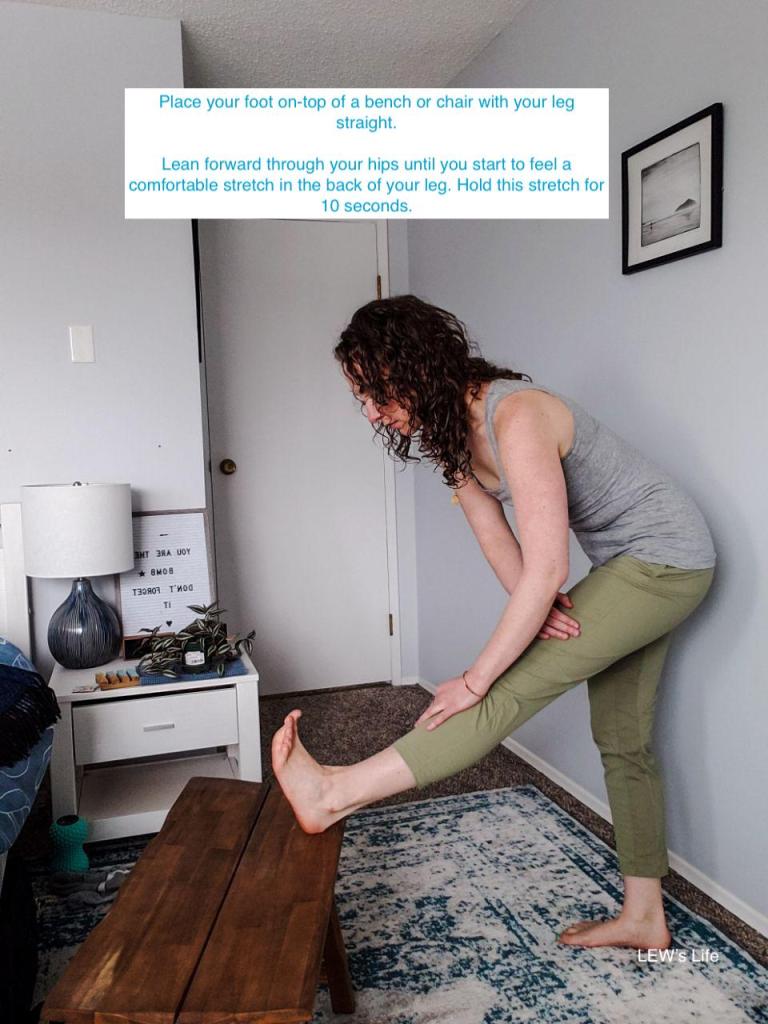
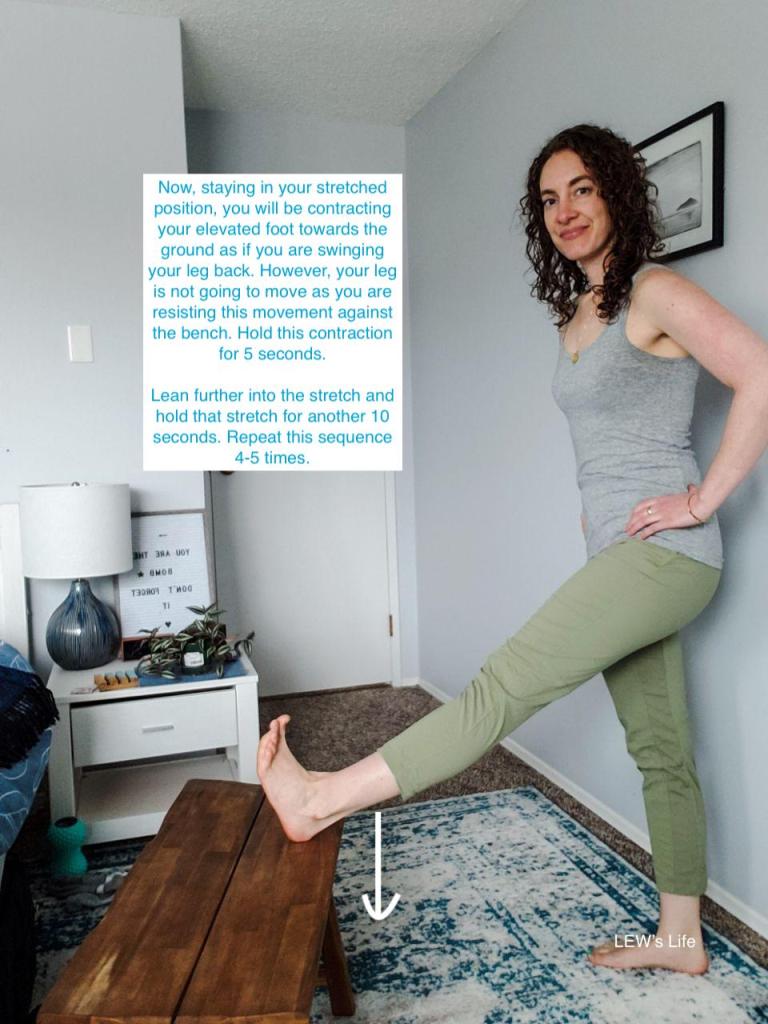
To correct the hamstring: Place your leg on a bench or chair with your leg straight. Bend forward through your hips until you feel a stretch in your hamstring. Hold the stretch for 8-10 seconds then contract your heel into the bench or ground to contract the hamstrings. Hold the contraction for 5 seconds then stop the contraction and move forward into the stretch and hold the stretch for 10 more seconds. Repeat this sequence 2-4 times. Stand back up and check your hip levels in the mirror.
Another way of stretching the hamstrings I demonstrated in a previous blog post where you use a yoga strap on the ground following the same PNF pattern as above. That blog post can be found here.
The quick and dirty way of doing this:
An easier, quicker but not as precise way of correcting the hips goes as follows.
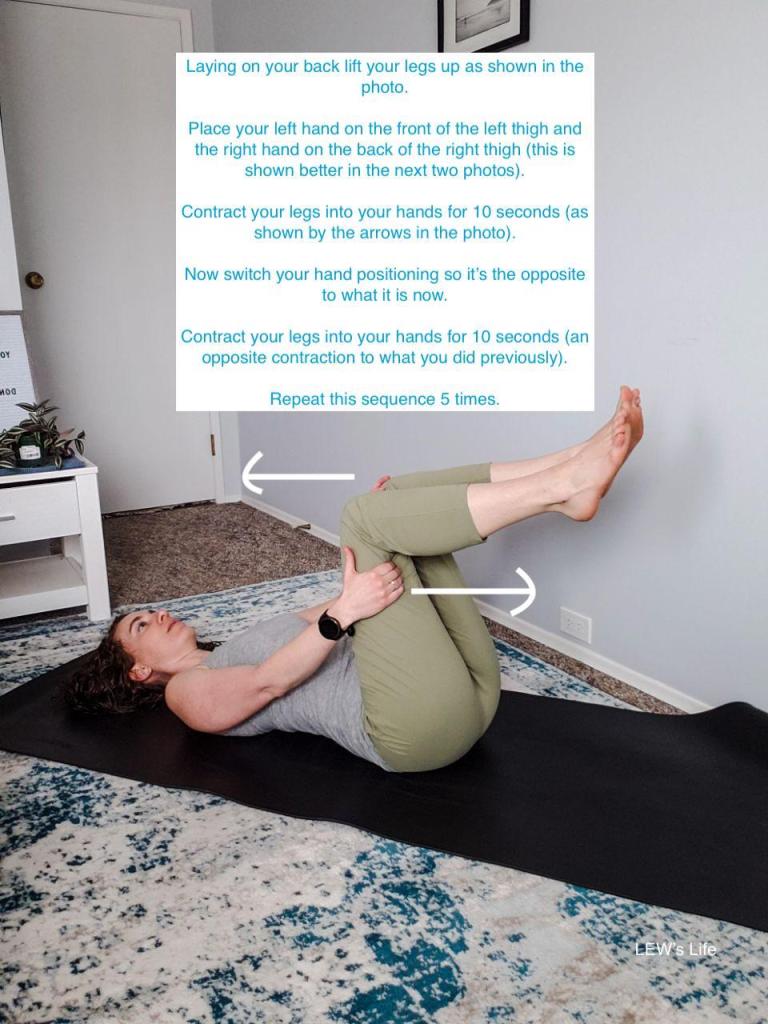
Hips Level on back: Laying on your back and legs up in the air, place your right hand on the front of the right knee and the left hand on the back of the left knee (into the hamstrings). Contract your right knee into your right hand and contract the left knee into your left hand. Your legs will be contracting into opposite directions. Hold the contraction for 10 seconds then switch hand positioning and repeat moving in the opposite direction as before and contract for another 10 seconds. Repeat 2-4 times per side.
Be sure to watch the video below from my Instagram account showing you how to level your hips.
Articles are for educational purposes only and are not intended to diagnose, treat, cure or prevent diseases. We cannot and do not provide medical advice or specific advice on products related to treatments of a disease or illness.
You must not rely on the information on our website as an alternative to medical advice from your doctor or other professional healthcare providers.
You should never delay seeking medical advice, disregard medical advice or discontinue medical treatment because of information on our website.
It is your responsibility to consult with your professional health care providers before starting any diet changes, exercise or supplementation program, and before taking; varying the dosage and / or ceasing to take any medication.
We do not collect any personal information or store cookies. You can turn off cookies on your web browsers.
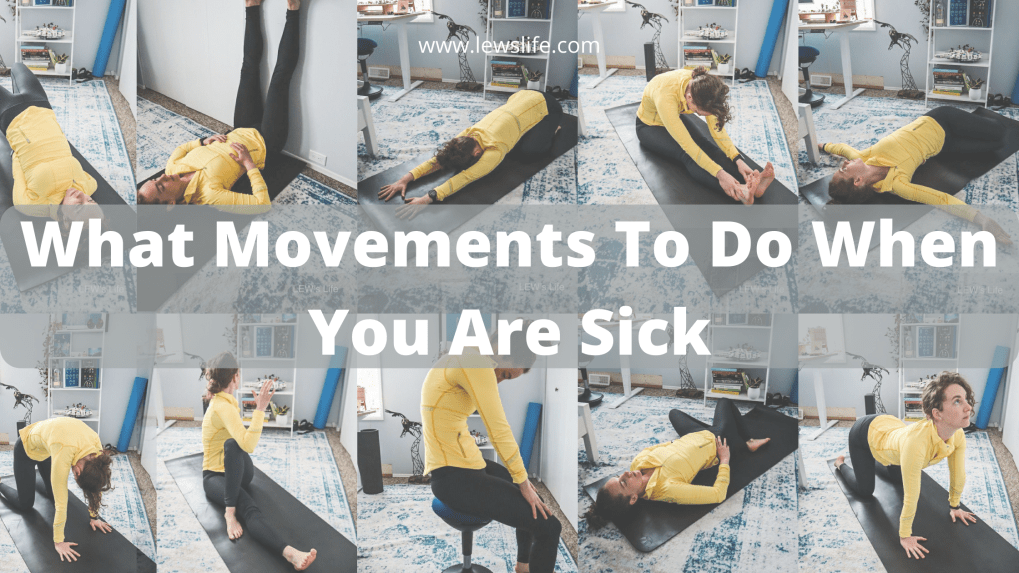
We all know when we are sick, regardless of whether it is respiratory or stomach, all we want to do is lay on the couch and sleep. Granted, the first few days, that is exactly what you should probably be doing. But what if I told you moving your body gently for a few minutes a day may be more beneficial.
Doing gentle movements to open up your chest if you have a respiratory cold and movements to get your bowels moving if you have the stomach flu can be exactly what the doctor ordered. I’m not talking movements to get you sweating, just easy movements to relax your nervous system and help your immune system fight whatever bug it is that you have.
Don’t feel the need to do all of these exercises, pick 1-3 of them if you aren’t feeling your best. Or if you are more at the end of your cold or flu and you have the energy, feel free to try them all out. The world is your oyster!
Diaphragmic Breathing
Why do this exercise when you are sick: This is probably the most important exercise to do when you are sick or not, as it helps to level out your nervous system and gets one of your main organs, your lungs, working at their top productivity, among all of your other organs as well. This is due to the vagus nerve that runs right through the diaphragm muscle and innervates with all of your organs.
Directions: Lay on your back and place one hand on your chest and one hand on your stomach. Take a deep breath in and see what your baseline breath is, see what hand moves first and what hand moves the most. If you are all stomach or all chest, we need to correct the way you breathe. The proper diaphragmic breath is having your stomach (the diaphragm) be the first movement in your breath, and as you continue to inhale, a small movement will happen second in your chest. Then you exhale from the chest into your stomach and repeat. This can be a challenging movement to perfect, so starting to practice this laying on your back with your knees bent is recommended. Be patient as this will come around and become easier the more you practice it. Really try to expand through your whole ribcage, the back, sides and into the front.
If you are an imaginary person, think as if you have a balloon in your stomach and you are inflating it from your stomach into your chest then slowly letting the air out of that balloon as you exhale. The movement will happen first in the stomach then as that “balloon” expands the movement will be second in the chest.
Thoracic rotations on the floor
Why do this exercise when you are sick: If you have the energy to roll out a yoga mat this one is for you. The thoracic spine is the section of your back that is just under your neck and right above your lower back. It is where your ribcage connects with the spine. If you have restricted movement in your t-spine, this can also restrict movement in your ribcage which will, in turn, restrict the space your lungs need to inhale and exhale. Therefore, getting more mobility into your t-spine will help with lung expansion, and this can help with getting out any of that phlegm that might be sitting in your lungs.
Directions: Lay on one side and bend your knees to a 90-degree position towards your chest. Now place your head on a pillow and extend both of your arms out in front of you with your hands together, like you are making the head of a crocodile. You are going to take a deep breath in as you extend your top arm further out, and as you exhale you will be pulling that top arm back across your body like you are pulling a bow and arrow back. The goal is to rotate through your back and get your top shoulder to touch the ground without over-extending through your shoulder. As you breathe in again you will bring your arm back over your body to your opposite hand where you started and repeat. Be sure to do this on both sides.
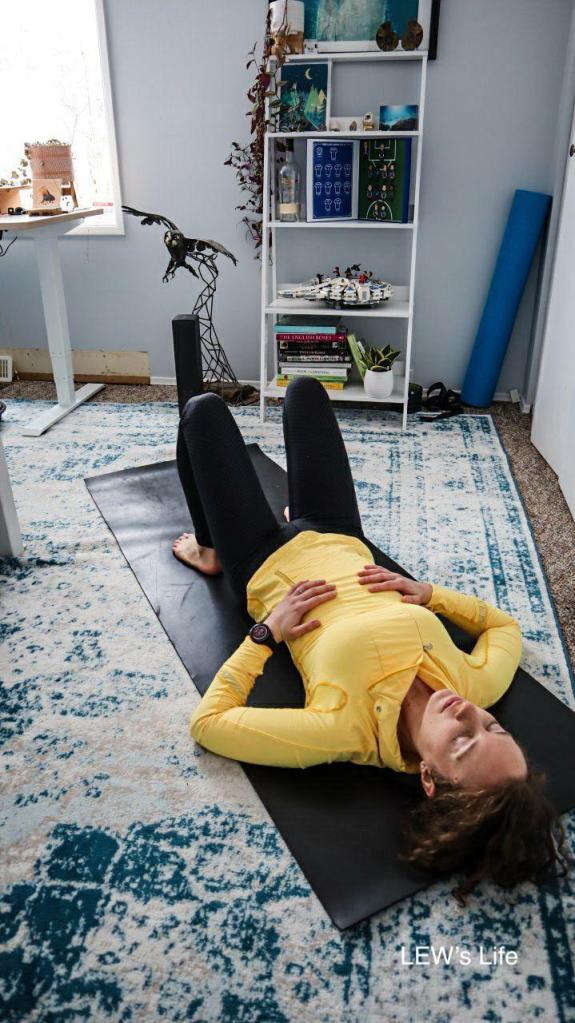
Lumbar rotations:
Why do this exercise when you are sick: If you have stomach sickness, it’s important to help your body heal by getting your bowels moving. You can do this by drinking a lot of clear fluids like water, but you can also do this with gentle movements like walking or certain stretching and mobility movements. By dropping your legs side to side you are gently massaging your bowels, lower back and hips. This in turn can help to get your bowels moving and your stomach flu out of your body.
Directions: Laying on your back with both of your knees bent and feet rested on the ground, slowly start to drop both of your knees to one side, back up and to the other side. This exercise is also known as ‘windshield wipers.’ You only want to drop your knees as far as is comfortable but where you may also get a nice stretch as well.
If you wanted to advance this exercise, once you are in a double knee drop, you could put your bottom foot over your top knee and hold this stretch for 10-15 seconds between lumbar rotations to get a stretch into your lower back, glutes and into the side of your leg.
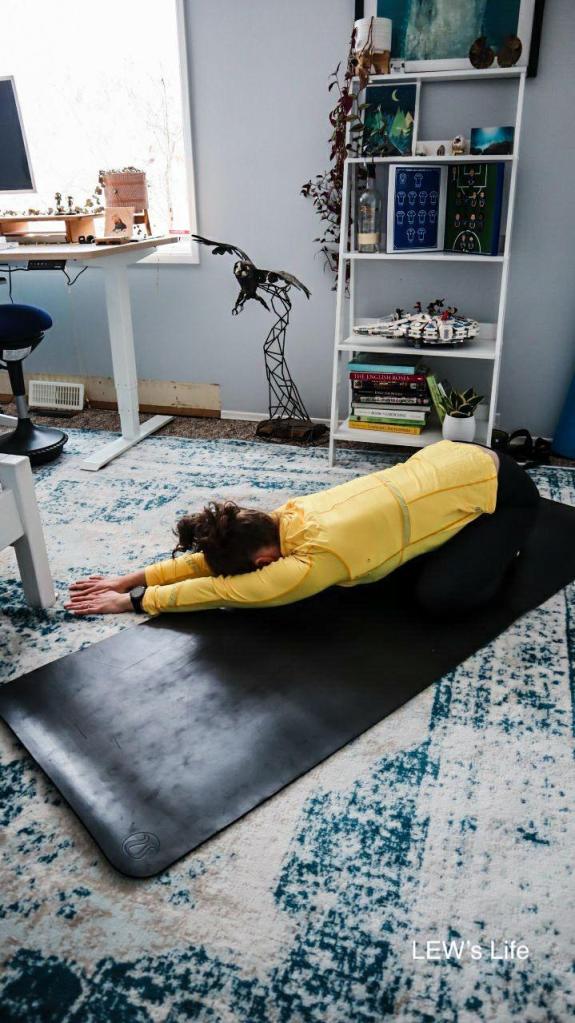
Child’s pose:
Why do this exercise when you are sick: This stretches your lower back and hips. The pressure from your bowels can push on your lower back and pelvic muscles and vice versa. By stretching your lower back and hips, you are loosening the muscles and taking some pressure off of your bowels. In the matter of a head cold, if you have phlegm in your chest, as mentioned above, getting movement to your ribcage and t-spine can help to expand your lungs to push that phlegm out. Some of your lower back muscles attach to the ribcage, so loosening them up will get more movement to your ribcage, lower back, hips and t-spine (midback).
Directions: Sitting on both knees on your mat, you can have both of your knees closer together for more of a lower back stretch or have both of your knees out to the width of your mat for more of a hip stretch. Choose which one feels right for you at this exact moment in time. Once you have chosen your knee position, reach both of your arms out in front of you as far as you can and rest your chest and forehead onto the mat. Once again, make sure you are comfortable in whichever position suits you and hold this stretch for 10-20 seconds or longer if you prefer. You can also reach out to both sides as well to get a nice side stretch through your back and hips.
Walking
Why do this exercise when you are sick: This is a simple and effective way to get your heart pumping and bowels moving. Going for even a 20 min walk can do wonders for your body even outside of a cold or flu. Going for a walk will help to get your bowels moving and expel the bug from within if you have the stomach flu, and usually, we have head colds in the winter, so going for a walk in the cold air will help your body make your nose run and push out any phlegm that can be sitting in your nasal cavity. Only go for a walk for as long as you seem fit for that day, you have to listen to your body and not overexert yourself.
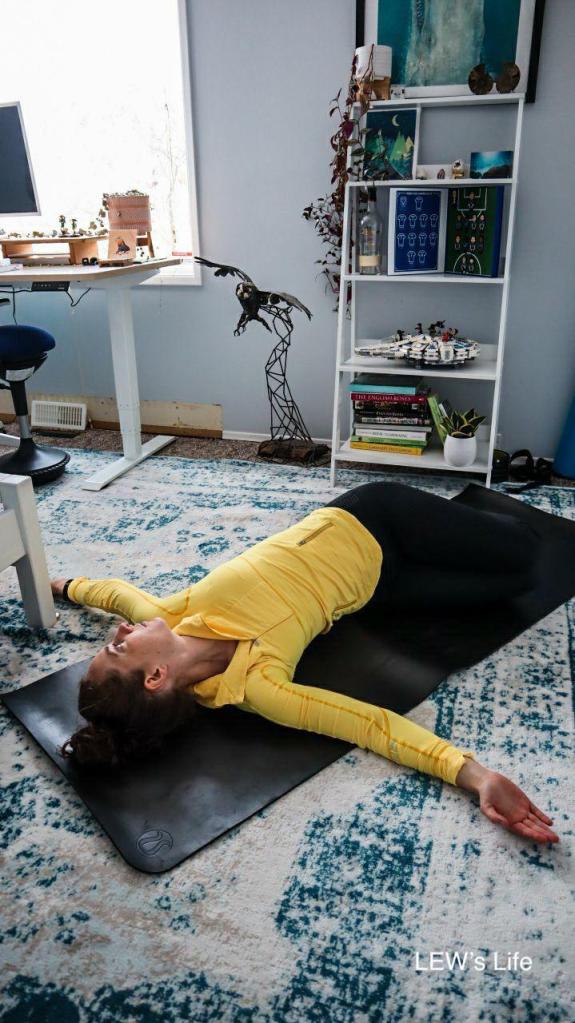
Reclining Spinal Twist:
Why do this exercise when you are sick: This stretch loosens up your back, shoulders, hips, and the side of your legs. As mentioned before, loosening up the muscles around your pelvis and chest and mobilizing the bones can help to take pressure off of your lungs and bowels.
Directions: Laying on your back, bring your right knee up towards your chest then use your left arm on your right knee to twist that knee to the opposite side rotating through your lower back. Now place your right arm out and rotate your head towards the extended arm. Hold this position for 10-15 seconds and switch sides.
Seated Spinal Twist:
Why do this exercise when you are sick: This stretch loosens up your back, shoulders, hips, and the side of your legs. As mentioned before, loosening up the muscles around your pelvis and chest along with mobilizing the joints can help to take pressure off of your lungs and bowels.
Directions: Sitting on your mat with both of your legs extended out, bend your right knee and cross it over your left leg. Now place your left elbow to the outside of your right knee and twist through your back so your right hand is placed on the floor behind you. Breathe into this stretch and hold for 10-15 seconds then repeat on the other side.
Bridge Pose:
Why do this exercise when you are sick: This exercise opens up the front of your chest, hips and abdomen while strengthening your glutes, hamstrings and back. It will take pressure off of the front of your body, especially from all the time we usually spend laying on the couch or in our beds when we are feeling sick. This will help to open up your chest and abdomen and take pressure off your bowels and lungs.
Directions: Laying on your back bend both of your knees and place your feet as close to your butt as you comfortably can without strain. Engage your core by bringing your belly button in and up, squeeze your butt muscles together, and push through both of your heels to lift your pelvis off the ground to a comfortable height for your back. If you want to advance this you can also bind your hands under your back on the floor under your bridge. Hold for 10-15 seconds and slowly come down back to the mat one vertebrae at a time.
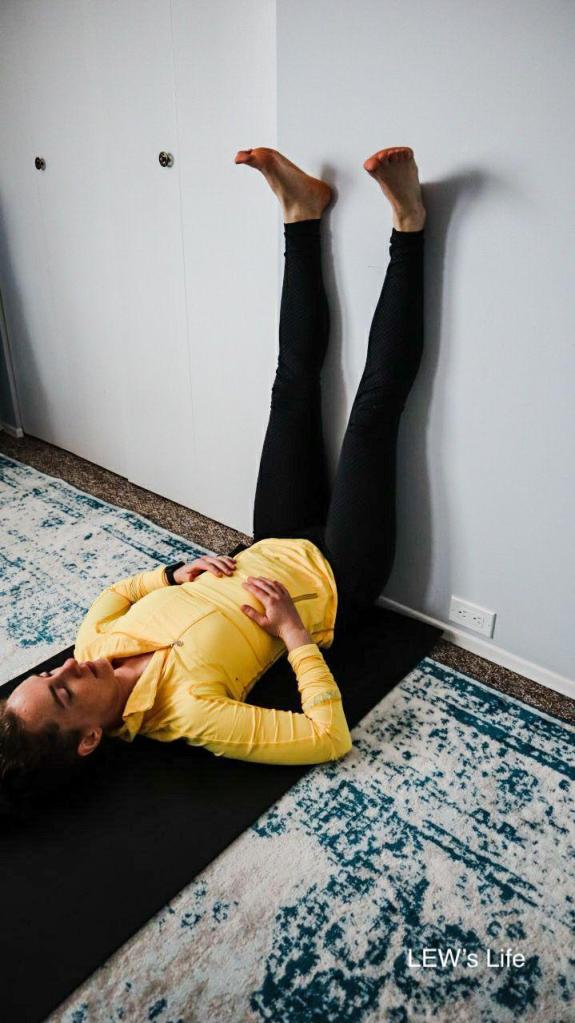
Direction: Laying on your back close to a wall, put both of your feet on the wall and extend your legs so they are straight against the wall. Bring your butt as close to the wall where you have a comfortable stretch and you are not feeling any strain in your legs, hips or back. Close your eyes and work on the diaphragm breathing that was mentioned at the beginning of this post for 5 minutes or longer.
Seated Forward Bend:
Why do this exercise when you are sick: This stretch will loosen up your lower back, hips and hamstrings into your calves. As mentioned before, loosening up the muscles around the hips, lower back and chest can help open up your lungs and get your bowels moving.
Directions: Sitting on your mat with both of your legs straight out in front of you, slowly start to bend forward to try and reach your toes but only go as far as you comfortably can and where you start to feel a comfortable stretch. Hold this position for 10-15 seconds.
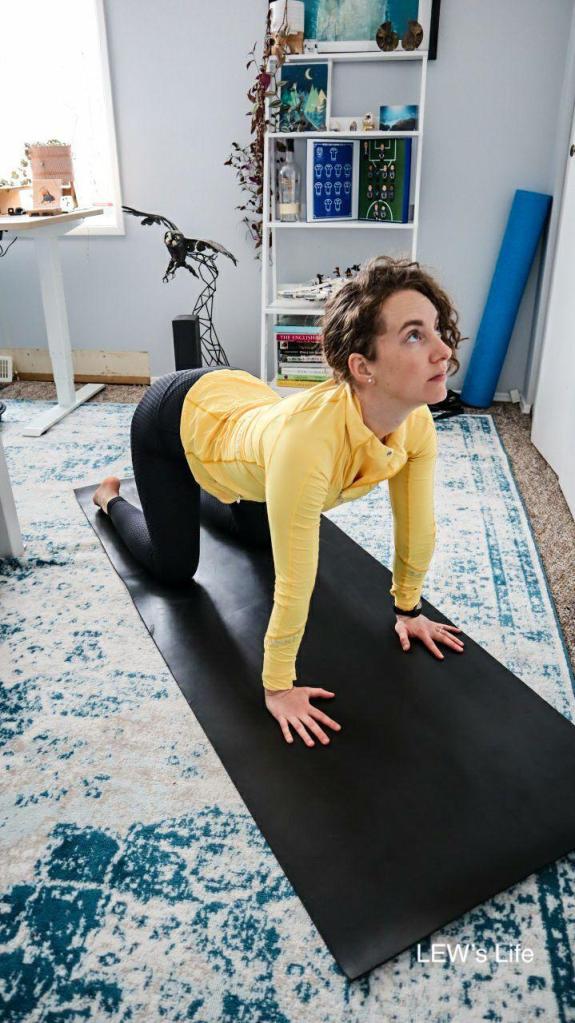
Cat/Camel: This exercise can be completed seated or on the ground on all fours.
Why do this exercise when you are sick: Just the same as with the thoracic rotation exercise, this will help to mobilize your thoracic spine. Just this time you are working on flexion and extension of the spine instead of rotation. Getting mobilization to your t-spine will help to get your ribcage moving as well which in turn will help your lungs to inhale and exhale easier to push the phlegm sitting in them out of your body.
Directions:
On the ground: position yourself on all fours with your hands under your shoulders and your knees under your hips. Inhale as you curve your spine down towards the ground and extend your head up and back. Exhale as you bring your belly button towards your spine, in and up, and arch your spine up towards the sky and tuck your head down. Move with your breath and transition between these two movements 5-10 times.
Seated: Just as above but now you are seated. Sitting in a chair or on the couch, place your hands on your thighs closer to your knees and inhale as you curve your spine forward and tilt your head back as you are looking up. Then as you exhale, arch your spine back and tuck your head towards your chest. Now transition between these two movements as you move through your natural breath.
At the end of the day, motion is lotion, even when you are not feeling your best, but always remember to listen to your body. If you need a rest day, take it. But these are just some suggestions of gentle movements that you can do while you are healing from a cold or the flu.
Here is the video showing how to do these exercises from my IG account:
With everyone sitting in a forward posture where your shoulders are rolled forward, the upper back is curved in a flexed position and you have a forward head posture, it is very common to have a tight upper back, chest and neck. Due to the chronic pressure you are placing on your skeleton sitting in a forward posture, a lot of strain is placed on the muscles of the upper back, chest and neck. This, in turn, can eventually develop into neurological symptoms like tingling and numbness in the arms and hands.
To avoid this from happening, you can give this simple exercise a try every day to open up your chest and correct your posture.
The Anatomy Basics
To keep things simple, but understandable, there is a line of nerves and other major stuctures like blood vessels that run under a few bones, along with a few neck and chest muscles. Therefore, when these muscles become tight from improper posture, an injury like a fracture to the clavicle, or with other musculoskeletal factors that can occur, those blood vessels and nerves can become compressed and cause symptoms into the head, neck, shoulder, arm and hand. This compression can occur in the neck, chest or even into the arm. This condition is called “Thoracic Outlet Symdrome,” as seen in the photo to the right.
How To Do The Exercise
This is a super simple exercise where you only need yourself and a wall.
Stand with your back facing a wall – preferably a wall without pictures or shelves on it as you will be moving your arms up and down and you don’t want to bump into anything.
Having your feet a few inches from the wall will be an easier position, whereas, standing with your feet up against the wall makes this exercise just a bit more challenging.
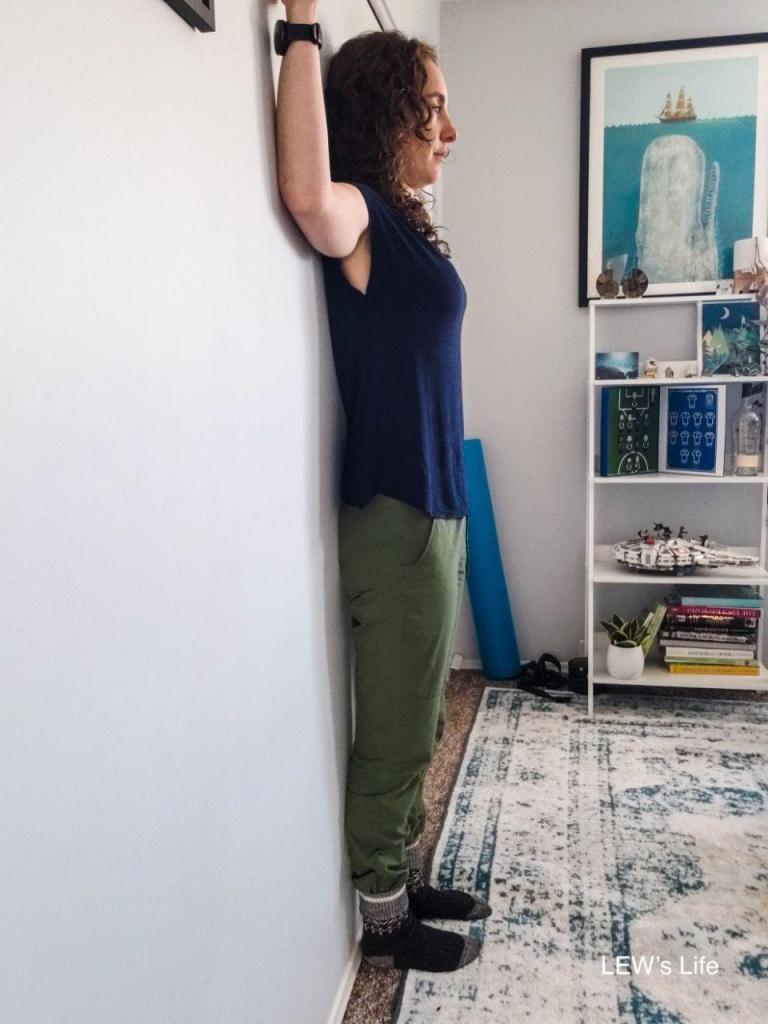
Once you have your footing in place, be sure that your upper back and hips are leaning against the wall. Now place your arms at shoulder height with your elbows touching the wall. If your elbows cannot touch the wall, move your feet away from the wall slightly and try again. If you can now touch your elbows to the wall the next step is to externally rotate your shoulder by placing the back of your hands against the wall with your elbows at a 90 degree angle (as shown in the photo). If you are having trouble resting your hands against the wall, then you will be working at going into internal and external rotation of the shoulder for now until your arms can reach.
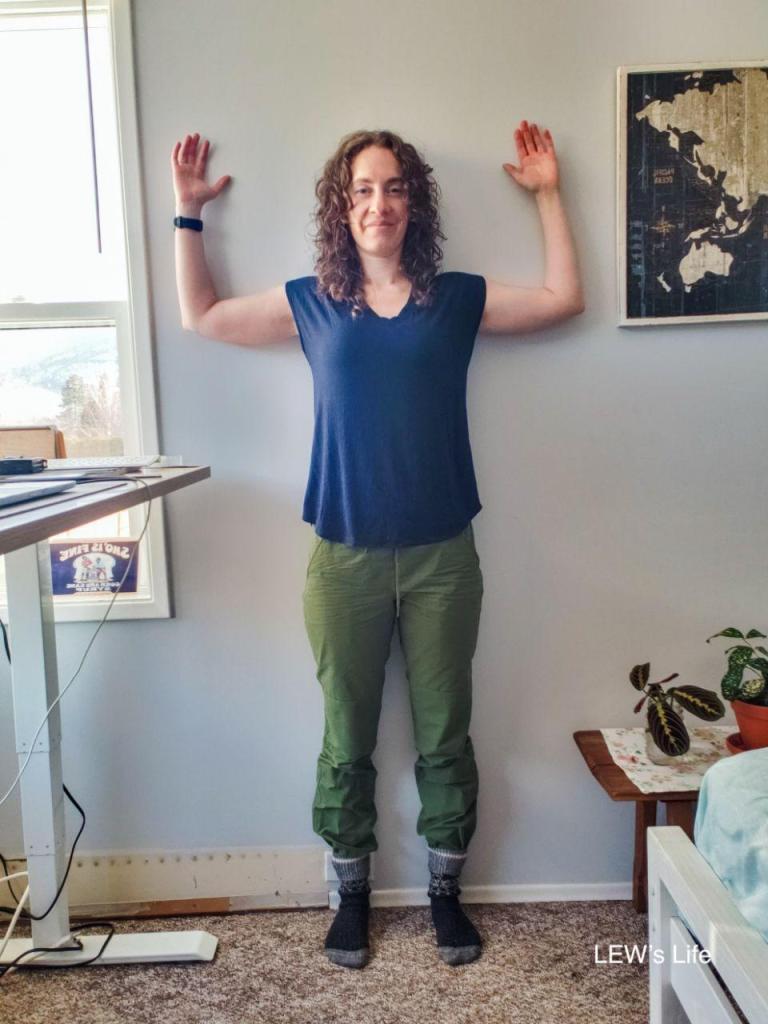
Once you can have your elbows and hands rested against the wall you can move your arms up and extend them over your head all while keeping your elbows and hands against the wall. If you feel your hands or elbows lift, that is as far as you move your arm above your head, stop and go back down to the starting position and move through that range of motion adding a few inches each time you raise your arms up if you can.
Do this 5-10 times and step away from the wall and feel how much more open your chest feels and how much taller you can stand. Magic.
This exercise can be repeated multiple times a day.
Here is a video from my Instagram Account that you can reference for the full explanation of how to do this exercise correctly:
I think it is safe to say, we have all been there with ongoing neck pain that seems to never go away. Along with correcting muscle imbalances in your body, using a ball to release your upper trap and neck muscles can be beneficial and give you the neck relief you need.
An Anatomy Lesson:
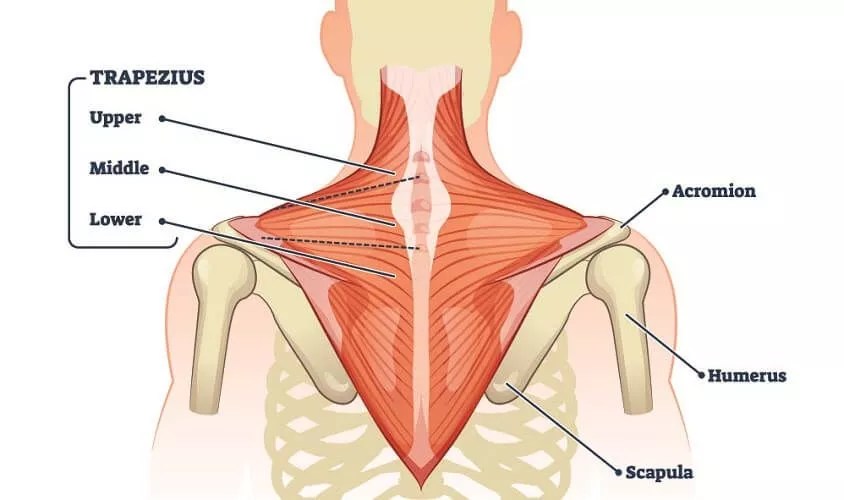
First things first, what are the upper fibres of the trapezius? This is the muscle you can see connecting from the neck into the top of the shoulder. It generally becomes a problem when it becomes tight and starts to pull at its origin and insertion. This can cause tension headaches and pain in the shoulder as well.
The traps themselves actually have an upper, mid and lower fiber. For the sake of this blog post, I will be focusing today on just the upper fibers.
Origin: 1 inch behind the mastoid process, superior nuchal line, ligamentum nuchae, SP of C7, external occipital protuberance. Insertion: Posterior boarder of the lateral 1/3 of the clavicle and the acromion process of the scapula. Layman’s terms: It starts in the head and neck and ends in the same side shoulder.
How to release your neck with a ball:
This discomfort can be corrected with muscle imbalance corrections, by decreasing the body’s dependency on the upper trap engaging and strengthening the midback muscles instead. However, if you are looking for a way to massage this muscle yourself, this can be done easily with a ball and the corner of a wall!
Grab a tennis ball or a lacrosse ball. A tennis ball is a lot softer and will not dig as deep, so it may be more comfortable for some. My personal favourite is using a lacrosse ball as I find it has better grip and can dig deeper into the tissue.
Place the ball onto the top of your shoulder over the upper trap muscle.
Step forward with one leg and lunge into the corner of a wall. DO NOT lean over with your back as this can put strain on your lower back.
Comfortably push your body weight against the wall and roll the ball around until you find a tender spot, this is called a trigger point.
You can hold onto that point and breathe it out until the pain goes from a 6-7/10 down to a 3-4/10 (1 being no pain and 10 being the worst you have ever felt). Or you can actively side bend your head away from the wall to give that muscle and active release.
If you have lower back pain, try this way of releasing instead:
Just as above, place the ball on the top of your shoulder.
Now you will lay on the ground and place yourself beside a corner of a wall, and have the ball between you and the wall.
Apply your desired body weight pressure against the ball and breathe it out as mentioned above or side bend your head way from the wall.
What better way to explain it than in a video!
Here is a video from my Instagram account @lewslife_ for a video on how to do both of the trap ball releases (be sure to turn up the volume as I’m verbally describing what to do as well as showing how to do it):
It’s that time of year again where the snow starts flying and we need to shovel it off of our driveways and sidewalks. The only difference for this year is we are not going to injure our backs while doing it!
Here are some tips on how to decrease the likelihood of injuring your back while shovelling the snow:
1) Bend through your hips and knees INSTEAD of bending through your back and keeping your knees and hips straight. This is a recipe for disaster even outside of shovelling snow. 2) Engage your core by contracting your belly button towards your spine and remembering to breathe. Hold this engagement throughout the whole movement. 3) Make sure to keep your shoulders back and down with a good chin tuck and keep your chest up rather than pointing towards the ground. 4) As you are in your deep squat, before picking the snow up from the ground, engage your glutes (squeeze your butt muscles together) then power up using your legs instead of your back. 5) Toss the snow to the side using your whole body NOT just your arms. Push through your legs and core to toss that snow off to the side. 6) Above all, have an active lifestyle where you work on your strength, mobility, flexibility and functional movements to prevent any future injuries. This can include a regular yoga or pilates practice, going to the gym, walking outside, hiking, or whichever movement floats your boat. Any movement is better than no movement.
Now go play in the snow ☃️❄️⛷️🏂🌨️
Here is a video from my Instagram account on how to do this properly:
Technology these days has us sitting in front of a computer, tablet or phone all day, and it also has us sitting in transportation like a car, train, plane or all of the alike. The problem with this is most of the time we do not correct the muscle imbalances that can occur with sitting for too long in our day-to-day lives. There are many musculoskeletal structures that can be placed into an imbalance with chronic sitting, but for the sake of this write-up, we will be focusing on the hamstrings.
The hamstrings are located on the back of your legs just underneath your gluteal muscles. There are many different reasons why they can become tight but here is one technique you can try to decrease the tension in them.
This is a contract/relax technique that is also known as proprioceptive neuromuscular facilitation (PNF). This is a technique you can use almost anywhere in your body to increase mobility in your muscles and joints and therefore increase your range of motion (ROM).
What you need: a) A mat to lay on b) Yoga strap, towel or rope
How to do the stretch:
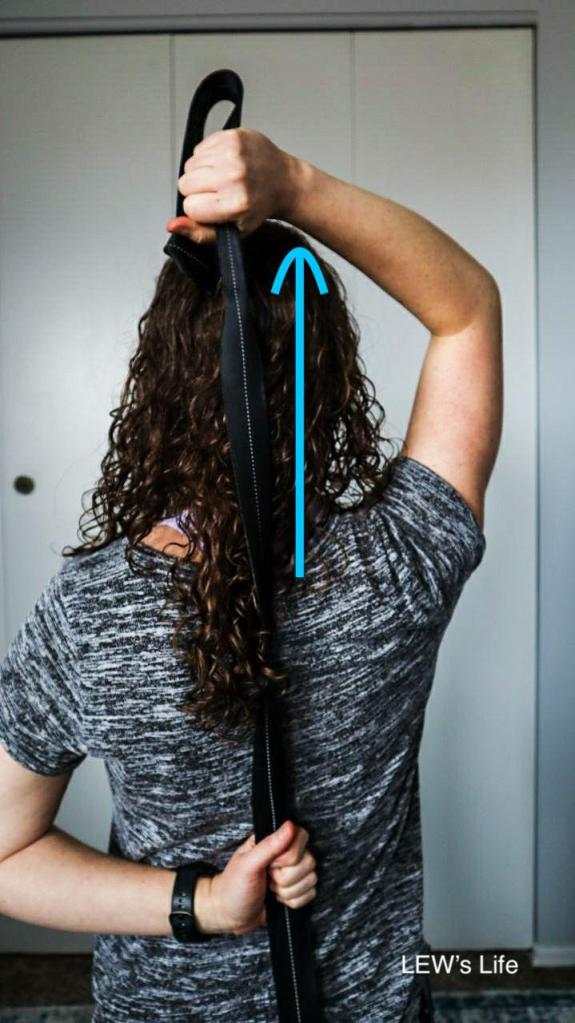
Bend down from a standing position to reach for your toes and test to see how far you can reach. Can you get to your thighs, shins, ankles, toes? Remember where you can reach as you will be testing this again after the contract/relax stretch.
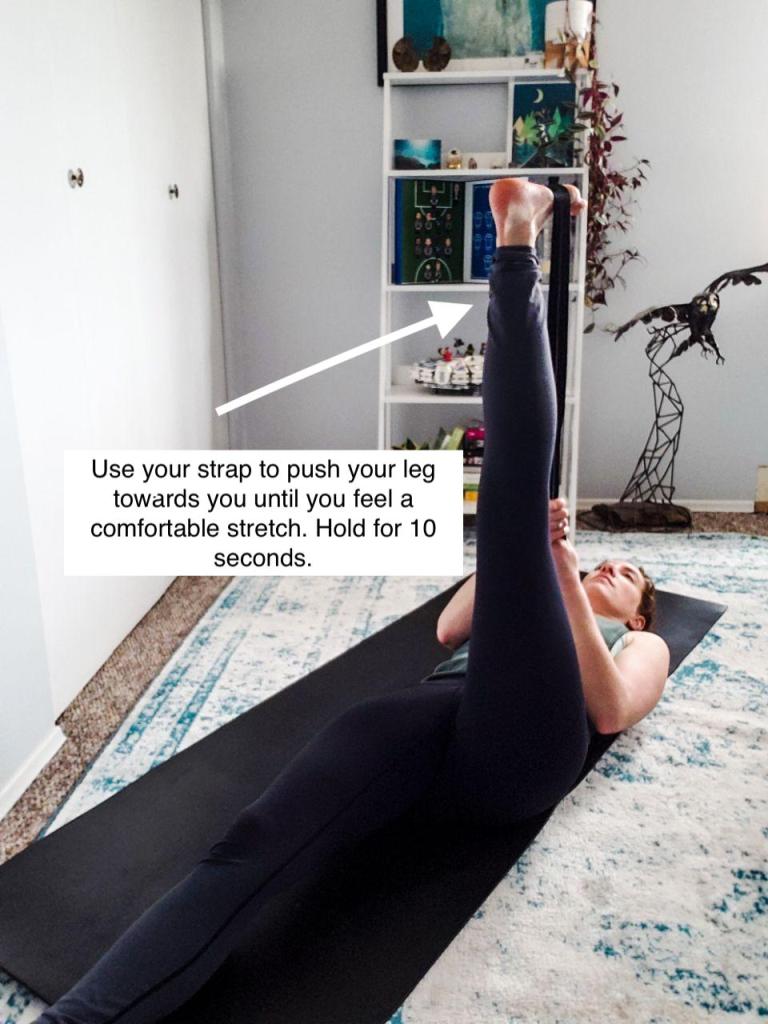
Lay comfortably on your back on your mat, and place the yoga strap around the middle arch of one foot.
Now lay with both legs straight on the ground and use your arms to pull the leg you have wrapped with the band up so that your leg is straight in the air. Only pull it up high enough that you feel a comfortable stretch in the back of your leg (you can feel this in the bottom and top of the back of your leg or one or the other). The other leg stays laying straight on the ground.
Hold this stretch for 10 seconds. Breathe through the stretch, it should feel like it’s starting to relax near the end of the 10 seconds.
Once the 10 seconds is over, now contract your leg into the rope as if you are pushing your leg to the ground without it moving, and hold this contraction for 5 seconds. You’re only pushing about 5 pounds of pressure into the rope – do not push as hard as you can into the rope. Just enough that you are getting the muscles contracting.
Once the 5 second contraction is done, pull the rope and your leg closer to your body to another and new comfortable stretch. Now hold this new stretch for 10 seconds and follow it with another 5 second contraction.
Repeat 4-5 times, then proceed to do the same stretch and process with your other leg.
Stand back up and measure how far you can reach for your toes again to feel the difference in your range of motion.
Give this a try the next time your hamstrings are feeling tight!
With our world functioning within the advancement of technology, we are all typically sitting all day in a forward head posture and rolled-forward shoulders (In fact, I’m doing this as we speak). This in the long run will cause a lot of difficulties and will cause chronic pain and injuries. One of the first functional movements that go in the shoulders is being able to reach your other hand behind your back. If you cannot do this movement, it will make the functionality of your life a bit more difficult, such as reaching to be able to put on your bra or scratch that really itchy part of your back.
One fun trick to be able to give yourself mobility with internal rotation of your shoulder is to do something called contract/relax. This is a Proprioceptive neuromuscular facilitation (PNF) technique and is super easy to use almost anywhere in your body to increase mobility in your muscles and joints and therefore increase your range of motion (ROM).
Follow the steps below to give this technique a try!
Grab a towel or yoga strap and place it in one hand, then put that arm over your head and behind your back (like the picture shows below).
Grab the end of the towel or strap with your other hand at hip height.
Pull up with the hand above to cause the one below to come up and cause a stretch in the shoulder of the bottom hand. Hold this stretch for 10 seconds.
Once the 10 seconds is done, now you are going to pull down with the bottom hand but the top hand is going to resist the movement, causing an isometric contraction (contracting the muscles without moving the joints). Hold this contraction with your bottom hand for 5 seconds.
Now repeat this process of contracting and relaxing between the two hands for 4-5 reps.
Then let the rope or towel go and try reaching for your other hand again and experience the magic of science!
Repeat and try this with your other shoulder.
Pretty cool eh?
You can use this concept almost anywhere in the body. Be sure to follow my Instagram account, Pinterest, or this blog for more fun tricks like this and more!
Here is a video of how I did this, the full video can also be found here.
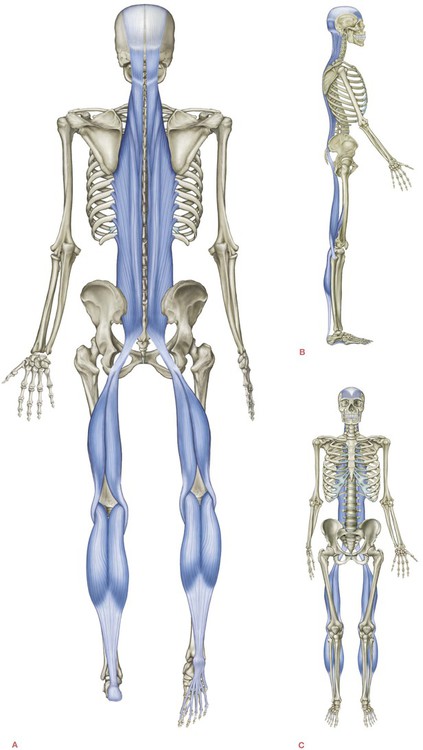
Have you ever stretched your hamstrings and lower back as much as you can but still have tightness? This can sometimes be due to a connective tissue structure called fascia.
Fascia is a thin casing of connective tissue that surrounds and holds every organ, blood vessel, bone, nerve fiber and muscle in place. The tissue does more than provide internal structure; fascia has nerves that make it almost as sensitive as skin. Therefore, it plays a major role in our musculoskeletal system.
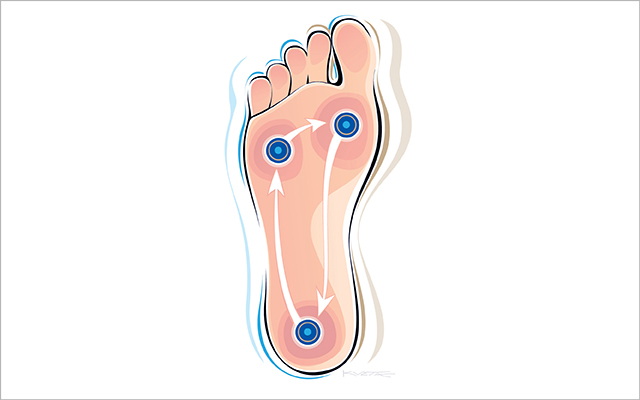
As shown in the book, Anatomy Trains, there is a fascial line from your skull down to your toes. If the fascia is tight it can tug and pull on the muscle causing it to feel tight. One way you can correct this is by rolling the bottom of your feet to loosen up the fascia at one end.
Give this a try to see if it helps you be able to bend forward to touch your toes easier:
Bend forward to touch your toes, but be sure to keep your knees straight and you bend from your hips not your knees. Measure how far you can reach and remember this length as you will be using it for reference again later.
Roll the bottom of both feet, but be sure that you roll slow and controlled. Rolling fast will not help to release the fascia. Be sure to roll front to back and into the arches of the foot. Roll for 2-5 min per foot. Roll in a triangle position like the picture shows to the right.
Now bend forward and try to touch you toes again. Notice the difference in how far forward you can bend.
Pretty cool eh?
This is how beneficial it can be to roll your muscles first before you stretch. So next time you have a good stretching session, roll out your muscles for a few minutes first and see how you feel!
I have a full video on how to do this on my Instagram account that can be found here.


