Apple and Apricot Crumble | Gluten Free

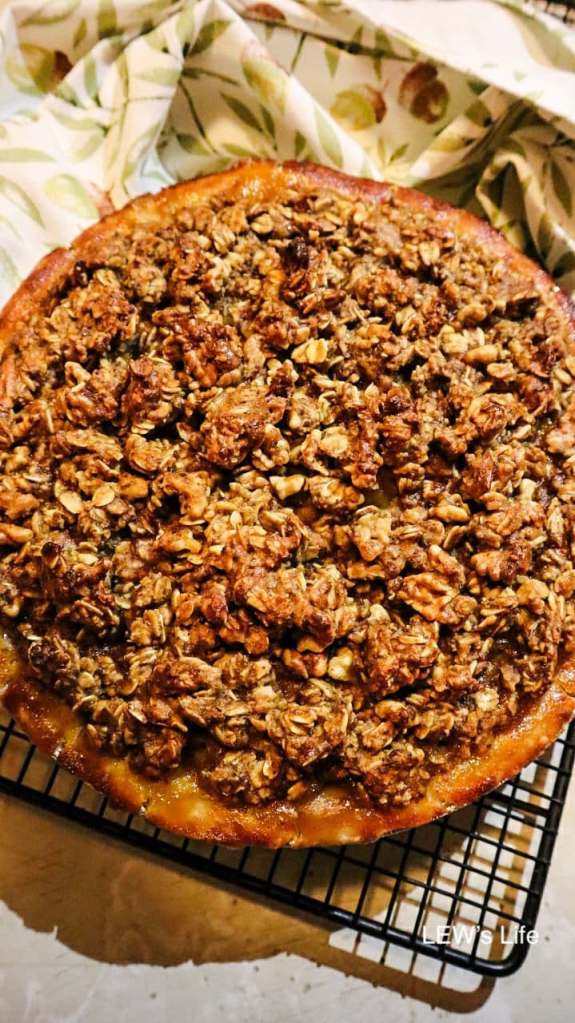
This is a super simple crumble recipe that I paired with a pre-made gluten-free pie crust. However, if you do not have the pie crust to use, not a problem, this is just as good without the crust.

Ingredients:

For the Crumble:

1 cup gluten-free oats
1/2 cup gluten-free flour
1/4 cup coconut sugar
1/4 cup melted vegan butter
2 flax eggs
1 tsp cinnamon
1/4 cup walnuts
2-3 TBS maple syrup

For the filling:

1 cup cut-up apricots
1 cup cut-up apples
1 tsp cinnamon
2-3 TBS maple syrup

Directions:

  1. Preheat the oven to 350F.
  2. Place all of the ingredients for the filling into a pan. Heat the ingredients on medium-high heat until it starts to boil, let it boil for 5-8 min while watching the pan as the ingredients can burn if you do not consistently stir it. Then place the ingredients on low heat and let it simmer for 15 min.
  3. While the filling is simmering, place all of the crumble ingredients into a food processor and blend up until well combined.
  4. Let the filling cool down before you place it into the gluten free pie crust of your choice, I used Wholly Gluten Free’s pie crust.
  5. Once the filling has cooled down, pour it into the pie crust, then place the crumble on top being sure to cover the whole top of the pie.
  6. Place the pie into the preheated oven for 50-60 min, or until the crumble on top is golden brown.

Enjoy on its own or with a scoop of delicious ice cream!


Energy Bars

Did you know to have a complete meal you need to have a carb, protein and a fruit or veg? These energy balls are a great way to get all three into one snack. They will also keep you going until your next big meal. Try these guys out as a quick and easy snack to make!

Ingredients:

2 cup dates
1/2 cup cashews
1/2 cup hazelnuts
1/2 cup goji berries
1/4 cup buckwheat groats
1/4 cup pumpkin seeds
1/4 cup chia seeds
1/4 cup hemp seeds
1/2 tsp pumpkin spice

Directions:

  1. Boil water and place the dates and goji berries into a bowl. Once the water is boiled, pour it over the dates and goji berries then let it sit for 20 min to soften them up. Or an alternative is to soak the dates in a bowl with water over night. By doing this you will make less work on your food processor engine 🙂
  2. Then add in the sofened date and goji berries into the food processor, then blitz it around until they are blended well.
  3. Now add in all of the nuts, seeds and pumpkin spice and blitz around until it combines. If you want it blended completely smooth you will have to blend it longer, however if you want the nuts and seeds to still be a bit crunchy blend for a minute or so.
  4. You can either roll the mix into little balls or put all of the mix into a parchment paper lined tin and make bars by spreading the mix around in the tin.
  5. Cut into bars or roll into balls and enjoy!

Pumpkin Pie Filling | Vegan & Gluten Free

If you already have a pie crust to use and you just need the filling for your delicious pumpkin pie, here it is!

Ingredients:

3 cups Pumpkin Puree (I used the full can of E.D. Smith, 796 mL)
1/4 – 1/2 cup Maple Syrup (depending on how sweet you like your pumpkin pie – adjust to your liking)
1/4 cup Coconut Sugar
1/3 cup Almond Milk (I used the unsweetened kind)
1 TBSP Coconut Oil
3 TBSP Arrowroot Starch
2 tsp Pumpkin Pie Spice
Pinch of salt

Optional:

Coconut Whipped Cream

An easy way of making it is simply by taking a can of coconut milk and chill it for a few hours. Then take out the solid coconut milk from the top and place it into a bowl and add as much maple syrup as you’d like to your sweetness levels. I used about 5-6 TBSP. Then use an electric hand mixer and mix it until small peaks form in the cream. Chill and add to the top of your pie!

Directions for the Pie Filling:

  1. Preheat oven to 350 F.
  2. Place all of the above ingredients into a food processor, then mix the ingredients together until smooth. You may need to scrape down the sides to get it all in.
  3. Put the pumpkin pie filling into your pie shell being sure to not over fill it. This recipe should fit a regular sized pie shell perfectly.
  4. Now it’s time to bake your pie! Place it in the oven for 60-65 min or until the top of the pie is golden brown.

Enjoy!


Gluten Free Stir Fry

This is a super easy recipe you can finish within 20 min! And it’s ingredients that are usually found in your kitchen already.

Ingredients:

For the sauce:
2 TBS Tamari or Coconut Aminos (make sure they are gluten free if you are celiac!)
2 TBS Maple Syrup
1 TBS Green Thai Paste
1 TBS Grainy Mustard

For the stir fry:
One medium onion
4 cloves of garlic
1 thumb size piece of ginger
Package of ground turkey
Mixed frozen veg – broccoli, kale, butternut squash
1 Cup of brown rice
Salt and pepper

Directions:

  1. Mix all of the ingredients for the stir fry sauce in a separate bowl and set aside.
  2. Boil 2 cups water and put in 1 cup of the brown rice and follow the packet instructions for cooking.
  3. Cut up the ginger, onion and garlic cloves into small pieces. Put them in a pan with a bit of oil to cook. Once they are browning, go onto step 4.
  4. Add in the ground turkey and cook until semi-cooked. You do this so the meat is not over cooked while the veg cooks.
  5. Add in the stir fry sauce you made.
  6. Add in the frozen veg and continue to cook until they are not frozen anymore.
  7. Add salt and pepper to taste

Enjoy your dinner!


Thai Coconut Mango Chicken Curry

Not to toot my own horn, but I think this curry is super delicious! Especially the next day when the flavours can really combine together. This meal is both savoury and sweet, the best of both worlds! If you are looking for a quick meal, that your taste buds will celebrate, this is the dinner for you!

Ingredients

6 Chicken Thighs
2 TBS Green Thai Paste
2 TBS Fish Sauce
2 TBS Coconut Sugar
1 Can White Beans
1 Can Coconut Milk
1/3 Cup Vegetable Broth
2 Mangos Chopped into Chunks
1 Cup Rice – Brown or white, whichever your preference

Directions

  1. Cook your rice as per the package instructions. Mine was 1 cup of brown rice per 2 cups of water for 20 min.
  2. Place some oil in a pan and heat it at medium heat for 2-3 min.
  3. Add in the cut up chicken thighs, when they touch the pan it should sizzle right away.
  4. Cook for 5 min at medium heat.
  5. Add in the green Thai paste, mix it into the chicken.
  6. Now add in the fish sauce, coconut sugar, white beans and cook for another 2-3 min.
  7. Add in the coconut milk and vegetable broth with the mango chunks, and bring it to a boil on high heat for 4-5 min. Then let it simmer for 5 min.
  8. Place your rice into a bowl and add the curry on top.
  9. Enjoy!

Let me know in the comments below if you give this recipe a try! Share it on Pinterest, IG, FB, or with friends and spread the love 🙂


Coconut Curry | Gluten Free, Dairy Free, Vegan

Looking for a quick and easy curry to make that tastes almost like a massaman curry? This is for you!

Ingredients

2 TBS Olive Oil
2 tsp Cumin Seeds
2 tsp Coriander Seeds
1 tsp Tumeric
1 tsp Coconut Sugar
1 TBS Almond Butter
2 tsp Red Thai Curry Paste
3 Garlic Cloves
1 Onion (medium sized)
1 Thumb Size Piece of Ginger
8-10 Button Mushrooms
4 small Bok Choy
1 x 400ml can Coconut Milk
1 x 540ml can White Kidney Beans
1/2 cup Vegetable Broth
Salt and Pepper to taste
1 cup Brown Rice

Directions

  1. Start cooking your rice as per instructions on the package.
  2. Put the olive oil into the pot and turn your stove top to medium heat.
  3. Once the pot is warm, add all of the spices including: cumin, coriander, and tumeric. Once the cumin and coriander seeds start to pop, add in the onion, garlic, ginger and coconut sugar.
  4. Let the ingredients cook until the onions become translucent. Once this happens add in the almond butter and red Thai curry paste. Cook for 3 more minutes.
  5. Now add in the chopped up mushrooms and bok choy. Cook for another 3-5 min.
  6. Add the coconut milk, kidney beans and vegetable broth and cook on high until it starts to boil.
  7. Once the curry has started to boil, turn the heat off and add to cooked rice of choice.

Suggestions: as with any cooking, add a bit of salt with every step to help with increasing the flavour of the dish.

If you give this one a try, please do leave a comment below and let me know what you think!

LEW xoxo


Keto Chocolate Avocado Mousse | Gluten and Dairy Free

This mousse is fantastic on a cake or eaten on it’s own. Made with simple ingredients and this one is made keto style.

Ingredients:

3 Avocado
2×1/4 Cup Cacao Powder
4 TBS Toasted Coconut Milk or any plant based milk
1 tsp Vanilla Extract
8-10 TBS Monk Fruit (add more if you want it sweeter)
Pinch of Salt

Directions:

  1. Place all ingredients into a food processor and blend until smooth.
  2. If you do not have a food processor, use a bowl and fork to smash the avocado and ingredients together.
  3. Taste for sweetness preference, then enjoy!
  4. Be sure to keep it refriderated.

Use this recipe as a quick snack or dessert, or pair it with a chocolate cake like this one.


Gluten Free Banana Muffins

You won’t regret making these muffins, they remind me of my mum’s banana muffins. Believe me when I say, that is something to be proud of.

Ingredients

1 cup 1 to 1 Bob’s Redmill Gluten Free Flour
1 cup Almond Flour
1/2 cup Cane Sugar
1 tsp Baking Soda
1 tsp Baking Powder
4 Bananas (browner the better)
2 Eggs
1/2 cup Olive Oil or Oil of Choice
1/4 cup Walnuts
1/4 cup Unsweetened Coconut Flakes

Directions:

  1. Preheat oven to 350F.
  2. In your food processor or bowl, add in all the dry ingredients that include: gluten free flour, almond flour, cane sugar, baking soda, baking powder. Mix until smooth.
  3. Next into your food processor add in your bananas, eggs, and olive oil. Now mix the wet ingredients with the dry ingredients until smooth and there are no lumps.
  4. Add in your walnuts and coconut and pulse the food processor.
  5. Put 2-3 tbs of mixture into each of your muffin tins (I used large muffin tins). This recipe makes 12 muffins.
  6. Place it into the oven for 20 min or until the muffins are golden brown and a toothpick or knife comes out of the middle of one without any batter on it.
  7. Let the muffins cool, and enjoy!

Let me know in the comments below if you give this recipe a try!

LEW xoxo


Keto Chocolate Cake | Gluten Free and Dairy Free

It was a friend of mines birthday recently and she is currently following the keto diet, so I had given myself a challenge to come up with a keto friendly chocolate cake recipe. I have to say, it’s pretty darn good. I hope you enjoy it too!

Ingredients

1 1/2 cup Almond Flour
1/4 cup Cacoa Powder
2 tsp Baking Powder
1/4 tsp Xanthan Gum
1/4 cup Monk Fruit – Add more if you want it sweeter
Handful of Cacoa Nibs
A Pinch of Salt
1/3 cup Milk of Choice – I used Almond Milk
3 Eggs
1 tsp Vanilla Extract

Directions

  1. Preheat the oven to 350oF.
  2. Place all dry ingredients into a bowl and mix them together. The dry ingredients include: almond flour, cacoa powder, baking powder, xantham gum, salt, cacoa nibs and monk fruit into the bowl.
  3. Place all wet ingredients into a bowl and mix them together. The wet ingredients include: almond milk, eggs, and vanilla extract.
  4. Now mix in the wet ingredients with the dry and mix them together until well combined and there are no clumps.
  5. Place the cake batter into a parchment paper lined tin or a greased tin. I used a loaf tin for mine.
  6. Bake in the oven for 20-30 min, each oven cooks differently. After 20 min, take the cake out of the oven and place a knife or toothpick in the middle to check if it is fully cooked through. If there is still cake batter on the knife or toothpick when you take it out – it’s not ready and needs to go back in for more time.
  7. When it is ready, take it out of the oven and let it cool completely before cutting or placing icing on the cake. This is very important, so be patient, it will be worth the wait. I used an avocado mousse on this cake which I will be uploading the recipe soon to this blog.

Enjoy the cake for a birthday, another celebration or just as a treat because we all deserve cake :).


Gluten Free Vegan Chocolate Chip Cookies

If you are looking for a chocolate chip cookie that is fantastic with your milk of choice, these are for you! The cocao nibs give these soft cookies a nice little crunch for your taste buds.

Ingredients:

1 Cup gluten free self raising flour
3/4 Cup almond flour
1 tsp cinnamon
1/4 Cup of sucanat, cane sugar, or coconut sugar (use 1/2 cup of sugar if you prefer your cookies being sweeter)
2 flax eggs – 2 Tbsp of ground flax seeds mixed with 6 Tbsp of water
1/4 Cup melted vegan butter (I used Melt)
1 Tbsp macadamia milk or other vegan milk of choice
1/2 cup choc chips (I used Enjoy Life chunks)
1 Tbsp cocao nibs

Directions:

  1. In a bowl, mix together all dry ingredients: gluten free self raising flour, almond flour, cinnamon, and sucanat.
  2. In a separate bowl, mix together all wet ingredients: flax eggs, vegan butter, and dairy free milk.
  3. Now combine wet ingredients to the dry ingredients and mix until you get a cookie dough consistency.
  4. Add in the chocolate chips and cocao nibs, and mix again until all combined.
  5. Use a tablespoon and scoop up the batter. You can roll the batter in your hands then place it on the cookie sheet and pat it down or scoop the batter out of the tablespoon and place right onto the cookie sheet.
  6. Put 12 cookies evenly apart on the cookie sheet – I did 3 across and 4 down the tray.
  7. Bake at 350oF for 10 min or until the bottom of the cookies are golden brown.

BAKING TIP: Cookies will continue cooking for a little while after they are out of the oven, if you want a softer cookie take them out when the bottom of the cookies are just turning golden. If you want a crunchier cookie, take them out when the top of the cookies are just turning golden brown.